Understanding Scanning & Graphics
By Shane Subervielle
Okay, your scanner is out of the box and hooked up, and you know you'll find plenty of uses for it in your ministry. Here are some things you should know as you begin!
Let the Creative Juices Flow
Your scanner opens up a whole new world for using media in your ministry. Scan pictures from last week's whipped cream fight and use them in next month's mail-out. If you have any artists among your teenagers, scan some of their best work and use it as clip-art on your next calendar. And let's not forget the power of group photos on a group website! Before you dive in to the world of scanning and working with scanned images, it will help you to know more about a few important concepts
Once scanned, a picture becomes a computer graphic, and graphics can take up a huge amount of disk space. Large graphics can slow your computer to a crawl and make it difficult to use your images. Even worse, large files posted on your website mean long download times and the increased possibility that your students will get impatient and not look at your site. After reading this article, you should know how to capture the best quality scan into the smallest possible computer file.
What You Should Know About Graphics
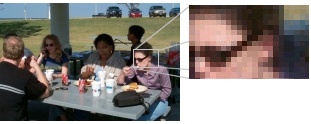
 Graphics can be stored on a computer as either raster or vector formats. A raster graphic is stored as a grid of pixels (or dots) where each pixel can be made a different color. Filenames with the extensions BMP, GIF, and JPG/JPEG are raster graphics. For example, the raster image on the right would be stored as a series of pixels. Pixel number one is white. Pixel number two is white… Pixel number 46 is maroon, and so forth. As you can see, this method can result in lots of information and large file sizes. Most graphics on the Internet are either GIF's of JPEG's.
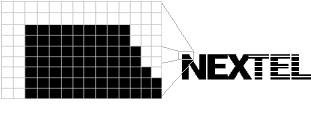
 Vector graphics are stored, not as a grid of pixels, but as a descriptive set of instructions. For instance, the image shown here is a good candidate for a vector image (even though it's shown as a raster). The instructions stored might include something like: draw a blue line starting from point (x,y) and go to the right for a certain length. Vector graphics usually make for smaller file sizes because the geometric drawing instructions take up less space than storing data on every pixel. The most common form of vector graphics on the web is Flash graphics. If you ever see an intro movie on a website with a Skip Intro link, this is probably done in Macromedia Flash.
Whenever you scan something into a computer, it will be stored as a raster image. So all that remains is to figure out how to make the raster file as small as possible and still maintain the quality of the image. It's important to understand that different formats like GIF and JPG work best for different types of images. If you're scanning in a photograph, the image will work better as a JPEG (or JPG) file. JPEG's are designed to store complex blending of millions of colors and shades like you see in a snapshot.
For plain images with simple lines and blocks of color, use the GIF format. GIF's can store only 256 colors, and this format is best suited for simple logo-type graphics or cartoon art. Company logos are usually good candidates for GIF files.
|
JPEG Image: Blending of lots of colors |
|
GIF Image: Lines & blocks of solid color |
Each format has it's own method for compressing graphical information. GIF's accomplish this by looking ahead at a string of pixels and grouping consecutive pixels of the same color. For example, instead of storing the same information about 80 identical pixels in a row, a GIF might collapse the information to say "the next 80 pixels are of color X". JPEG's have a much more complicated compression scheme, and you can often use a slider bar to choose between low compression with little quality loss and high compression with more quality loss.
Bitmaps (BMP's) have absolutely no compression built into them! Do not save your image as a BMP file unless you know you have reason to. Your file size will be huge, and this large file will be slow to work with. You may also not be able to transport the image on a disk, etc.
Attributes that Affect File Size
When scanning a document into an image, you should have some idea of the file format you should save it as (GIF or JPEG). There are a few other attributes that will greatly influence the size of the resulting file. These attributes are resolution, dimensions, and color depth.
Resolution is the amount of pixels (or dots) stored in a square inch of space. When performing a scan, think ahead about what the scanned image will be used for. Is it important that the image look good when printed again, or are you only showing this image on a computer monitor? The reason for this question is that you have the option to change the resolution of the scanned image. A resolution of 72 dpi (dots per inch, sometimes known as ppi) is perfect for displaying on computer monitors because that's the best resolution they can display. But printers can show much more detail. They usually print out at 300-1200 dpi. Higher resolutions lead to larger file sizes, but if you plan to print the image then set your scanning resolution higher.
The physical dimensions of the image are also important. If you're scanning in an 8.5 by 11-inch page but you plan to shrink the graphic down to take up a quarter of a page, then set the output dimensions of your scan accordingly. If you scan the image in at 100%, the file will be larger than necessary. When you embed the full size image in your desktop publishing program, it may slow down your computer tremendously.
If you plan to post your images to a website, you should keep your images at slightly less than 800 pixels wide and at 72ppi resolution. The reason for this is that some people still have their computer monitors set at 800x600 resolution. If one of these people visits your site and looks at a larger picture, they will have to scroll to the right in order to see it. When I post a picture to our youth group's website, I make two copies of the image. One is full size and the other is a smaller, thumbnail version. The user can see an entire page of thumbnails and click each for the larger version. The thumbnail page downloads quickly and the user can choose which larger versions to view.
Color depth is the last thing you can use to reduce the size of your resulting file. Color depth simply means the amount of different colors used in the image. If your page is black and white then you want to look for the option to scan in 256 colors or grayscale. By default, you may be scanning in millions of colors, which adds unnecessary information, increasing the file size.
You Gotta Have Goals
In general, if you are scanning 35mm photos for use on the web, you can wind up with a 500x300 pixel JPG image file that might range in size from 15KB to 60KB. Remember to set your resolution as close to 72ppi as your program will allow. If you plan on re-printing your image in a publication, your file sizes should be significantly larger.
I've also made extensive use of a FREE image optimizer on the web at Spinwave.com. This utility lets you submit a file from your hard drive and see a spread of copies that are progressively optimized by eliminating colors. I highly recommend that you run your images through something like this to make them as small as possible without losing the quality of the image.
Wrap-Up
With a little experimentation, you will gain an intuition for which file format is best for a given image. It's always going to be a tug-of-war between making the file smaller and keeping the image quality where you want it. Happy scanning!
|
|
Other Resources:
Please notify me of any broken links and I'll immediately and gladly correct them. Email your questions, ideas, review requests and comments to .
Copyright 1997-2026, YouthPastor.com. All Rights Reserved
http://www.youthpastor.com/2000/index.cfm/A/Scanning.htm
Reproduction allowed for personal use only. More info at:
http://www.youthpastor.com/about/index.cfm/fuseaction/legal.htm